

|
Archive for the ‘Seasonal Foods’ Category
Thursday, May 12th, 2016

First off, a few of you might have noticed, I haven’t posted anything for weeks. Months? Okay, it’s been well over 2 years. You know how it goes; life happens and priorities change. I’ll spare you the details, but suffice to say that life is short and I’d rather spend time doing fun things with the people I care about, rather than sitting at my computer writing blog posts. No offense, I loved the old-school blogging world. Back in the olden days (I started this blog in 2006), the food/nutrition blogosphere was a tightly knit, supportive community. The gluten-free sub-set of that community was very small and consisted of people helping people. Friendly people sharing information, nourishing spirits, and promoting good health. It lessened the feeling of isolation a restrictive diet (for medical reasons) can foster. There was a genuine sense of belonging, but somewhere along the way, we hit a tipping point. I’m not sure I like the direction we’ve tipped.
Having said that, every so often something comes up that motivates me to dust off my blog, catch up with WordPress, and get back into writing about food and exercise. This is one of those times — the ongoing oat saga. Oats (gluten-free) are, and always have been, a mainstay of my diet, even though I have celiac disease. They’re versatile, they’re nutritious (or can be), they taste good, they cook up quickly, and are a perfect addition to an athlete’s and/or backpacker’s pantry. I use oatmeal loaded with dried fruit, nuts, and seeds as breakfast fuel for early morning mountain bike rides. I grind them up and use them in homemade energy bars. I bake bread from oat flour. They’re a backpacking and camping staple. I even use oats as a protein booster in veggie burgers.
The GOOD
Many years ago I discovered Montana Gluten-Free Processors. The “Know Your Farmer, Know Your Food” theme is more difficult than it sounds, but I do know these people. I know the brilliant (and quirky) plant scientist who selected this oat variety based on nutritional value. I know the CEO of Montana Gluten-Free (AKA: head farmer, Gary Iverson) who lives a gluten-free lifestyle, grows these oats, and insures that they’re truly gluten-free. They harvest, mill, and package their products with dedicated equipment. The oats are processed in a certified gluten-free facility. They’re organic, non-GMO, hull-less (easier to digest), low glycemic, and are 25% higher in protein than other oat varieties. They also test out at under 3 ppm with ELISA testing protocols. What more could you ask for? Other than excellent customer service from pleasant, reliable, salt-of-the-earth folks. They’re the best. For more information, check out their website.
The BAD
Talk about “knowing your farmer.” Who’s behind the oats at General Mills? Who is General Mills? Who’s responsible for the cereal products labeled gluten-free at General Mills that weren’t actually gluten-free? Who knows? I understand the need for easy, convenient breakfast foods. Who hasn’t dumped a handful of Cheerios on their toddler’s high chair tray at one time or another? I’ll admit to that — back when I was juggling four kiddos at once, although I’d like to think our food quality was a little better back then (30-some years ago). That was also pre-celiac disease days, before the word “gluten” was part of our family’s vocabulary. If you’re unfamiliar with the gluten contamination and quality control problems at General Mills (and Quaker), check out Trisha Thompson’s (at Gluten-Free Watchdog) gluten-free testing data. You can find that information here.
The UGLY
Would you like a side of weed-killer with your oatmeal?
Glyphosate is a broad spectrum, systemic herbicide used to kill weeds, especially perennial weeds and grasses that compete with crops. According to the National Pesticide Information Center, glyphosate is the most widely used, non-selective (meaning it will kill most plants) herbicide used in the United States. Glyphosate is the active ingredient in Roundup, the brand-name of the herbicide produced by Monsanto. Because glyphosate is non-selective, some crops have been genetically modified (GM) to be resistant to the herbicide. They’re called Roundup Ready crops. Farmers can plant these GM plants and spray them with Roundup (glyphosate) to eliminate unwanted weeds without killing the crop.
In March of 2015 the International Agency for Research on Cancer, which is part of the World Health Organization, assessed the cancer-causing potential of glyphosate and several other pesticides. Glyphosate was classified as probably carcinogenic to humans. It was also determined that glyphosate caused DNA and chromosomal damage in human cells.
What does this have to do with oatmeal, you ask? According to Forbes Magazine, Quaker Oats is facing a potential class-action lawsuit because they claim their oats are “100% Natural” and are grown using “eco-friendly” farming practices, and yet they spray the oats with glyphosate before harvest. Glyphosate can also be used as a drying agent. Although it’s not against the law to use glyphosate on cereal crops, calling the product “Natural” and suggesting the farming practices are “eco friendly” is a stretch — and deceptive, hence the lawsuit.
I have a science degree, but I’m not a plant scientist, so I don’t understand how organophosphate pesticides like glyphosate work, how much of this stuff is in our food system, how dangerous these substances are to human health, or how detrimental they may be to the soil and water. And other than the basic definition of manually inserting new DNA into an organism to add new traits to that organism, I have a foggy understanding of genetic engineering. What I do know is that my intuition tells me spraying poison on food and then eating it is probably a bad thing. Especially if it causes DNA and chromosomal damage and probably causes cancer. As for manipulating genetic material and engineering food crops, I don’t know, but I’d like to choose not to eat those foods if I knew which ones they were. At this point, they aren’t universally labeled.
Bottom line? If at all possible, get involved in your community — support small farmers who are trying to grow nutritious and safe food, frequent farmer’s markets, ask questions, do what you can to increase agricultural awareness, help grow an appreciation and understanding of where our food comes from, and make choices that support local food production. Know your farmer, know your food. It’s not easy or always practical, I know that, but it’s important for overall health. The more we know, the better (and healthier) choices we can make.
Peace, love and good food.
Melissa
Thursday, October 24th, 2013
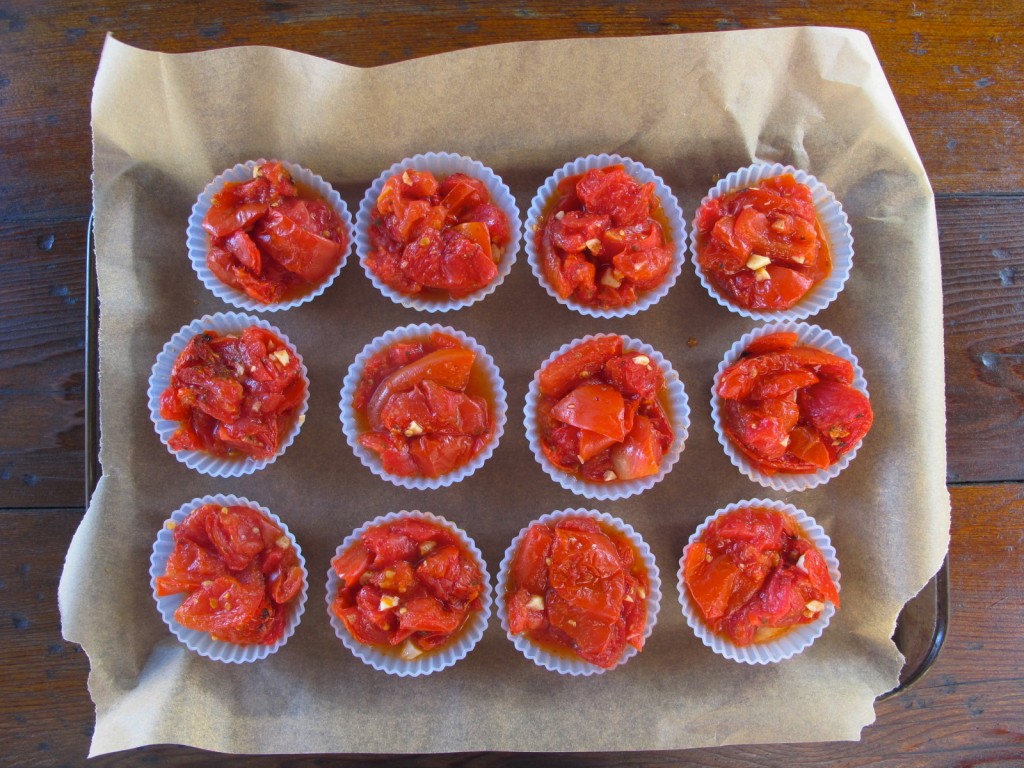
I’m lucky enough to live next door to the most prolific organic tomato gardener in all of Colorado. My geographic good fortune and love of simple food has sparked my produce-sparing creativity. Every few days I get another supply of tomatoes. Tossing even one of these gems into the compost pile is not an option. They are that good.
Here’s my way of saving the harvest and enjoying them all winter long. This is a “launching pad” recipe. Adjust according to what you have and how much you want to freeze. Once frozen, you can toss however many you need into soups and stews or thaw and blitz for pizza sauce.
Frozen roasted tomatoes (I used 10 medium-size tomatoes for the photo above)
What you need
Fresh tomatoes, washed and quartered (deseed and drain off most of the liquid)
Garlic, minced (I used 6 cloves for this bunch; garlic is optional)
Extra virgin olive oil
Silicone (not paper) muffin cups (these are the kind I use)
What you do
Place parchment paper on a large baking sheet. Preheat oven to 425 degrees. Put prepared tomatoes and garlic in a large bowl. Drizzle a small amount of olive oil over ingredients and toss gently. Arrange tomatoes in a layer on the baking sheet. Place in the oven and set the timer for about 6 to 8 minutes. Using tongs or a spatula, periodically rearrange the tomatoes so they roast evenly. It takes a total of about 30 minutes to fully roast them, but do it in increments and check often as they burn easily. Remove from oven and let cool. Once the tomatoes have cooled, using tongs, fill the silicone muffin cups with tomatoes. Place the filled muffin cups on a cookie sheet and put in the freezer. Once frozen, pop the frozen tomatoes out of the silicone muffin cups and place into a freezer container or plastic freezer bag. Use as needed.
The photo above was taken after the tomatoes were roasted and placed in the muffin cups, but before I put the cookie sheet into my freezer. Use silicone muffin cups. Paper muffin cups don’t work.
Next up, gluten-free roasted tomato and basil pizza. Stay tuned. You will not believe how good this is.
Peace, love and frozen tomatoes.
Melissa
Wednesday, July 25th, 2012

Gluten-Free Tomato and Arugula Pizza
I have a half-written blog post on weight loss, carbohydrate and fat metabolism, and mitochondrial dysfunction, but it’s taking me some time to sort through the material and make it marginally readable. I want to share my findings with you, but it’s a tough subject to make entertaining. I’ve discovered some interesting variables in my attempt to get back in shape and lose the weight I gained while co-writing (with endurance athlete Pete Bronski, founder of No Gluten No Problem) a book on gluten-free sports nutrition and training.
Yes, I do see the irony.
Anyway, I know you’re dying to hear all about metabolic flexibility and why boosting the density of your mitochondria will help you burn calories more efficiently, but you’ll have to wait until next week. This whole weight loss thing is not easy, at least not if you plan to keep it off FOREVER. That’s the point, right?
But for now, although not exactly “diet” food, let’s talk about gluten-free pizza. Yes, I know — I have an excessive number of pizza-centered posts here on my blog. Pizza is my comfort food and I’m not afraid of carbs (decent carbs), so I usually make some version of vegetarian pizza at least once a week. This was the “Friday night special” last week. I served it with a nice, semi-chilled glass of red wine. There’s no reason a couple of slices of this pizza can’t be part of a healthy eating plan, especially if you top it with low calorie, nutrient-rich vegetables.
As some of you know, I have a CSA share through Grant Family Farms. It includes organic veggies, fruit, pastured eggs, and micro-greens. I’m loving the micro-greens and have been experimenting with everything from mustard micro-green pesto to komatsuna salads. This recipe is for fresh arugula topped pizza.
Gluten-free tomato and arugula micro-green pizza
what you need
1 package (2 crusts) Udi’s gluten-free pizza crusts (or, your favorite version)
1 to 2 tablespoons extra virgin olive oil
2 cloves garlic, finely minced (more if you like garlic)
tomatoes, thinly sliced, juice and seeds removed *
sprinkling of cheese
fresh arugula micro greens, about 2 cups washed and dried
what you do
1. Brush the pizza crust with a small amount of olive oil. Don’t use too much, but cover the crust with a thin brushing of oil.
2. Sprinkle with minced garlic and top with sliced tomatoes. I like to use a lot of tomatoes and cover the whole pizza with a single layer.
3. Top with shredded cheese. I used a small amount of freshly grated Parmesan cheese on this pizza, but any cheese is fine.
4. Bake according to pizza crust directions. I’ve been baking the pizza on the outside grill because it’s been too hot to turn the oven on. The crust comes out nice and crunchy.
5. Once the pizza is cooked, top with fresh arugula.
* I slice the tomatoes and spin them in my salad spinner to de-juice them. Then I save the juice to add to homemade salad dressings.
Peace, love, and gluten-free pizza!
Melissa
P.S. Stay tuned for mitochondrial density, movement, and weight loss.
Wednesday, June 20th, 2012

Micro-greens are early versions of most vegetables, leafy greens, and some herbs. They aren’t the same as sprouts. They’re more like baby, leafy-green houseplants that you can eat. Sprouts are grown in water, micro-greens are grown in soil and harvested when the leaves open, but before they mature. The main difference between the two is the size of the root and the length of time before harvest. Although neither take long to grow, sprouts are quicker to reach harvest size.
I love micro greens — partly because they’re fun to experiment with and a nice diversion from regular vegetables, but also because of the vibrant colors, zippy taste, and nutrient density. They pack a lot of low-calorie punch in their tiny leaves and stems.
These feisty little mustard plants start with a sweet, mellow taste, but finish with a peppery bite. I sprinkle them on salads and tacos, but when I want full-on, zippy flavor (a touch wasabi-ish), this pesto recipe is the best. Serve with grilled salmon or pasta.
Mustard micro-green pesto
what you need
2 cups mustard micro-greens (washed and dried)
2 tablespoons chopped garlic scapes, about 2–3 scapes (or 2 garlic cloves)
2 tablespoons pine nuts
2–3 tablespoons extra-virgin olive oil
1 tablespoon fresh-squeezed lemon juice
1/2 cup freshly grated Parmesan cheese
pinch of sea salt
what you do
1. Place micro greens in a food processor. Add garlic scapes (or, peeled and coarsely chopped garlic cloves), pine nuts, and lemon juice and pulse a few times to chop and blend well.
2. Add the Parmesan and slowly add the olive oil while pulsing to reach the consistency you desire. I don’t like pesto to be overly oily, so adjust to your liking. Taste and add a pinch of salt if needed.
Pesto is user-friendly. Be creative.
Peace, love and micro-greens.
Melissa
Tuesday, March 20th, 2012

According to my Understanding Normal and Clinical Nutrition book, if you live for 65 years or longer, you will have consumed more than 70,000 meals and disposed of 50 tons of food.
FIFTY TONS OF FOOD?!
Yikes, that’s a lot of food.
Okay—one ton is 2000 pounds. In that case, the average (whatever average means) person consumes 100,000 pounds of food in 65 years (give or take a few pounds). So, 500,000 pounds of food would keep 5 people nourished for 65 years. Very cool.
Andy Grant (hard-working farmer, soil scientist, and plant guru) and Grant Family Farms (my organic CSA) donated almost 500,000 pounds of fresh food to the community last year via several food banks in Colorado and Wyoming. Over the past few years, Andy and the gang have donated over 2,000,000 pounds of food (you read that right—6 zeros). They even shipped food to communities in need after hurricane Katrina.
That’s how it’s done. People helping people.
Andy hates to toot his own horn, so I’ll toot it for him. I’m so impressed (and humbled) at how hard the folks at Grant Family Farms work to support the community and I’m over-the-top grateful to have their organically grown, local food grace my table and boost my health. Join a CSA and help support this grass roots movement to reclaim our food supply. It starts at home.
Farm-fresh frittata
what you need
1 tablespoon butter
1/2 cup chopped onion
2 cloves garlic, minced
2 cups chopped squash (zucchini or yellow)
1 tomato, seeded and chopped (drain the juice)
1 cup spinach, chopped
6 organic pastured eggs, beaten
2 teaspoons Simply Organic All-Purpose Seasoning
Sprinkling of Parmesan cheese (optional)
Sea salt and fresh ground pepper
what you do
1. Heat oven to 375 degrees. In a heavy skillet (I use a cast iron skillet to prepare and bake the frittata in), heat the butter over low-medium heat. Make sure you coat the bottom and sides of the skillet with butter. Sauté onions for about 5 minutes. Add garlic, stir and cook another 2 to 3 minutes.
2. Add the squash and continue cooking for about 5 more minutes. Don’t let the veggies burn, cook until slightly tender. Remove from heat. Add chopped tomatoes, spinach, and herbs. Mix well.
3. Pour eggs over top and gently stir to blend ingredients.
4. Place skillet on center rack of preheated oven and cook for 15 minutes. Remove from oven, sprinkle with Parmesan cheese and return to oven for an additional 5 to 7 minutes until eggs are firm and top is slightly browned.
5. Season with sea salt and freshly ground pepper. Serve immediately.

For more information about Andy Grant and why we need to support our local farmers, please watch this short video.
“Dammit, we’re doing the right thing.” – Andy Grant
Yes, you are Andy, and I love you for it!
Peace, joy, and farm-fresh veggies!
Melissa
Monday, January 23rd, 2012

I have a theory that if you keep your intentions (or resolutions as is the case with each new year) to yourself, you have a better chance of achieving them. The more you talk about something—a goal, a resolution, a project, an intention—the more it scatters. It’s like you’re frittering away bits and pieces of your grand design each time you mention it. The more you talk about it, the less interesting it becomes. Your brain registers a premature sense of accomplishment.
So—I’ve decided not to broadcast my list of 2012 resolutions. I’m keeping them to myself, thinking they have more power to blossom if I don’t talk about them (especially that 5 pounds I need to ditch and the mountain I want to climb).
Out with the old—in with the new.
Instead of a resolution list, I’m making a list (a glossary actually) of farm-fresh words to share over at The Balanced Platter, Amy (Simply Sugar and Dairy Free) and Maggie’s (She Let Them Eat Cake) new home for all things related to healthy and balanced living. During this month’s launch of TBP, you’ll find a steady stream of up-to-date information, helpful tips, brilliant ideas, and wholesome recipes instead of resolutions. We’re all in this together, let’s share our wisdom for a brighter and more balanced 2012.
Balanced Living Lingo
Biodynamic: A form of organic farming that emphasizes the relationship between the soil, plants, and animals as a self-sustaining system. Biodynamic farmers seek to maximize diversity in their farming practices by treating their farm as a unified organism. They avoid the use of artificial chemicals and practice crop rotation, composting, and plant and harvest according to seasonal and lunar rhythms.
Cage-Free Eggs: There is no legal definition of cage-free. Often cage-free hens live in crowded conditions with no access to the outdoors. Seek out local farmers who practice human animal husbandry. Organic eggs from healthy, pastured chickens look and taste very different from the conventional version.
Certified Naturally Grown: Certified Naturally Grown (CNG) products are certified by an independent nonprofit organization (not USDA) as having been produced in approximate accordance with national organic standards, a program involving fewer paperwork requirement and lower certification fees for farmers than the USDA’s National Organic Program.
Community Garden: A community owned and/or operated plot of land that is divided up for individuals or families to grow food. Community Gardens provide an opportunity to grow low cost, nutritious food and can contribute to the local economy by allowing gardeners to sell their produce at Farmer’s Markets.
Community Supported Agriculture (CSA): Consumers buy a share in a local farm or garden, usually paying before the beginning of the season—in return, they receive a weekly supply of fresh, local produce that is harvested throughout the growing season. By paying up-front the shareholder gives the farmer cash to start the season and also takes on some of the risks associated with farming (hail, drought, etc.). I’ve been a member of Grant Family Farms CSA here in Colorado for years and appreciate the opportunity to have locally grown, organic food, fresh from the farm. Check here to find a CSA in your area.
Conventional: Refers to standard agricultural practices that are widespread in the industry. Can (but does not necessarily) include the use of pesticides, synthetic fertilizers, mono-cropping, antibiotics, hormones, and other chemical approaches. Conventional farming in the U.S. may also include the use of GMOs.
Farmer’s Market: Refers to an open-air market where farmer’s sell their produce directly to consumers.
Farmstead Cheese: Farmstead cheeses are made by the same people who farm the animals producing the milk.
Farm-To-Table: Signifies that the food on the table came directly from a specific farm, or a meal prepared and served at the farm where the food was grown. The use of farm-to-table also emphasizes a direct relationship between a farm and a restaurant or store.
Food Shed: The term food shed is similar to the concept of a watershed while watersheds ouline the amount and flow of water supplying a particular area, foodsheds outline the flow of food feeding a particular area. Your foodshed encompasses the farm, your table, and everything in between.
Free-Range: USDA regulations apply only to poultry and indicate that the animal has been “allowed access to the outside.” The USDA regulations do not specify the quality or size of the “outside” or the duration of time an animal has “access to the outside.” Most farmers that you meet at the farmer’s market or through your CSA raise animals that are actually free to roam naturally, but if you want to be certain, you should visit the farm.
GMO (Genetically Modified Organism): GMOs are plants and animals whose genetic make-up has been altered to exhibit traits that they would not normally have, like longer shelf-life, different color, or resistance to certain chemicals. In general, genes are taken (copied) from one organism that shows a desired trait and transferred into the genetic code of another organism. Genetic modification is currently allowed in conventional farming.
Gleaning: To gather food left behind after the harvest. Sometimes farmers invite people to their farms to glean for free food or to donate food to food banks.
Grass-Fed: Refers to livestock, especially cattle or sheep, that have been fed grass instead of corn or soy (grains). Grain is commonly fed because the cattle or sheep fatten more quickly, but grain creates abnormal acidity in their digestive system, which negatively effects their overall health. Meat and milk from 100% grass-fed animals have a healthy ratio of omega 3-6-9′s and a higher amount of conjugated linoleic acids (CLA, a fatty acid that has health-promoting properties).
Heirloom: Heirloom crop varieties, also called farmer’s varieties or traditional varieties, have been developed by farmers through generations. Generally speaking, heirlooms are varieties that have been in existence for a minimum of fifty years.
Heritage: A term applied to breeds of livestock that were bred over time to be well-adapted to local environmental conditions, withstand disease, and survive in harsh environmental conditions. Heritage breeds generally have slow growth rates and long productive lifespans outdoors, making them well-suited for grazing and pasturing.
Local Food System: When all aspects of the production, distribution, storage, consumption, and sale of food are operated, managed, and owned by the community it serves. This is part of the broader sustainable food movement.
Locavore: A person who is interested in eating food that is regionally produced as part of the collaborative effort to build more locally based, self-reliant food economies.
Natural: USDA guidelines state that all “natural” meat and poultry products can only undergo minimal processing and cannot contain artificial colors, artificial flavors, preservatives, or other artificial ingredients. The claim “natural” is otherwise unregulated. In many cases, it means nothing.
No Anitibiotics: Antibiotics are given to animals such as cows, hogs, sheep, and chickens to prevent or manage diseases. “No antibiotics,” implies that a farmer does not administer antibiotics to his/her animals.
No Hormones: Hormones are commonly used in the commercial farming of animals such as cattle to speed the growth rate or increase milk production. Some of these hormones are natural, some are synthetic, and some are genetically engineered. If a ranch or product professes “no hormones,” this means that they do not engage in these practices. Hormones are not allowed in raising hogs or poultry.
Organically Grown: Food grown without synthetic pesticides, insecticides, herbicides, fungicides, hormones, antibiotics, fertilizers or other synthetic or toxic substances. Organic food does not include foods that have been irradiated or genetically modified.
Pastured: There are no regulations as to what this defines. If a farmer states their animals are pastured, the animals should spend time living on pasture as opposed to just having “access” to pasture. Time that an animal can actually live on pasture will vary regionally based on weather and length of growing season. To know for sure, ask the farmer and visit the farm.
Raw Foodism: The practice of consuming uncooked, unprocessed, and often organic foods as a large percentage of the diet.
Seed Saving: The practice of collecting seeds in order to preserve the genetic diversity of our agricultural heritage that is now threatened by agricultural seed monopolies.
Slow Food: An international movement that began in Italy as a reaction to the fast food industry. The Slow Food movement seeks to preserve the culture of food by education consumers about the seasonality of foods and which foods grown in their region, by connecting consumers to farmers, and by celebrating high quality food with others. There are Slow Food Chapters all over the world that celebrate good, clean, fair food.
Sulphured/Unsulphured: Many dried fruits are sulfured with sulfur dioxide (SO), or meta bisulfate to keep them from oxidizing during and after the drying process. This preserves their original color and acts as a preservative. Unsulfured fruits are often dark in color.
Sustainable Agriculture: Farming that is socially just, humane, economically viable, and environmentally sound.
Transitional: Farmers must practice organic methods for three years on a given piece of land before the products harvested from that land can be sold or labeled organic. “Transitional” is an unofficial term that refers to farmland that is in a transition period towards organic certification.
Urban Agriculture: The practice of cultivating, processing, and distributing food in an urban, rather than rural, environment. Urban farming is integrated into the urban economic and ecological system. For example, large gardens (mini farms) are being grown on rooftops in large cities. Vacant lots are being used for agricultural purposes.
Vegan: Foods with this label contain no animal products such as meat, dairy, eggs, gelatin, or honey.
Check out The Balanced Platter for more tips on bringing balance into your life! And please join me on Facebook and Twitter or subscribe to my blog for post updates (see above).
Peace, love, and balanced living in 2012!

Thank you to Pitchfork Pinups and The Farmer’s Market Coalition for some of these glossary terms.
Wednesday, November 9th, 2011

I’m a bit of an odd duck.
I ate these roasted Brussels sprouts and cipollini onions over a mix of creamy sweet brown rice and oats—for breakfast this morning. Yes, for breakfast. And trust me, it was off-the-charts delicious.
Monday is my organic food delivery day. I belong to Grant Family Farms CSA and I’m the grateful recipient of 26 week’s worth of organic veggies, fruit and pastured eggs. I’ve been a member of Grant Farm’s CSA program for 5 years now and I’ve gotten very good at using up my bounty. BUT, it’s not easy unless you shift your thinking and eat vegetables for breakfast as well as lunch and dinner. I’m more than happy to do that as I’m a plant girl at heart.
If you prefer keeping Brussels sprouts at arm’s length, try them for breakfast. They’re ridiculously healthy and taste wonderful if you cook them right. Here’s how. Adjust ingredient amounts according to how much you want to make. The above photo was a single portion made in my grandmother’s small, cast iron skillet. Okay, it might have been a double portion, but I made it a single serving.
Cipollini (pronounced chip-oh-lee-nee) onions are small, mild and very sweet. Perfect for breakfast. The pinch of brown sugar and the natural sweetness of the onions carmelizes and sweetens the Brussels sprouts. They’re a delightful pair.
roasted Brussels sprouts and cipollini onions
10–12 Brussels sprouts
2–4 cipollini onions
1 tablespoon olive oil, plus a drizzle for the skillet
fresh ground black pepper
sea salt
brown sugar
Wash and trim Brussels sprouts, cut in half. Peel onions and cut in quarters. Place sprouts and onions in a small bowl. Add olive oil and mix well. Grind pepper over bowl (several grinds), sprinkle with salt (I like a good amount) and brown sugar (about 1/2 to 1 teaspoon). Mix well. Pour veggies into lightly oiled cast iron skillet and place on center rack of pre-heated 400 degree oven. Roast for 20 minutes. Pull skillet out of the oven and mix veggies to insure all sides get roasted. I usually add another pinch or two of sea salt, another grind of pepper and a pinch of brown sugar. Place back in the oven for another 10 to 15 minutes until golden brown.
Eat before 6 AM and fly through your morning.
Peace, love and breakfast veggies!
Melissa
Friday, July 29th, 2011

I have a new favorite pizza topping. Actually, two new favorites, although one of them is hard to come by. Remember the quinoa greens? This is a pizza I made with quinoa greens, scallions (my new favorite pizza topping), garlic and tomatoes. If you’ve been following this blog for any length of time, you’ll know I like thin crust, gluten-free pizza, but I like it with fresh, wholesome vegetables and I don’t like tomato sauce.
The thinner the crust, the better. Less “bready” calories and I like the crunchy texture of cracker-thin crusts. But you must try pizza with scallions cut the long way and spread out on the crust. They’re over-the-top delicious. Seriously good. The quinoa greens are wonderful as well, but after two deliveries to my local organic market, they’ve disappeared.

Half of the ingredients in these before photos came from my Grant Family Farms CSA veggie share. I’ve been getting the most amazing organic scallions, broccoli, spinach, beets and fresh garlic lately (along with a lot of other nutrient-dense goodies). I used Udi’s Gluten-Free Pizza Crusts, brushed them lightly with olive oil and spread a bunch of chopped garlic over that. Organic, farm-fresh garlic is incredible, especially topped with fresh, sliced tomatoes. I washed the scallions, trimmed the ends (but left them fairly long) and then sliced them the long way. After spreading them over the crust, I topped that with the quinoa greens and a light sprinkling of raw cheddar cheese. I did exactly the same preparation with the other pizza crust (olive oil and fresh garlic), but topped it with broccoli, spinach, beet greens and a sprinkling of cheese.
I baked them in a 375 degree oven for about 12 minutes. Divine!
You might also like some of my other strange pizza combinations.
radicchio and squash pizza (with some extras)
beet pizza, red chile enchilada pizza, BBQ chicken and onion ring pizza, etc.
Or, great ideas from other gluten-free bloggers
flourless pizza with pears, candied bacon and caramelized onions at Simply Gluten Free
To learn to make your own crust, check out Gluten Free Girl (and the chef) for directions and a video
Peace, love and scallions on pizza!
Melissa
P.S. Do you call them scallions or green onions?
Monday, November 15th, 2010

Those of you who have been following this blog know I’m head-over-heels in love with my local farmer, Andy Grant. The way to this woman’s heart is via freshly harvested, organic produce.
Or expensive glittery things.
Or new backcountry gear.
A study in contrasts? Most likely. I have no problem wearing sparkly earrings while backpacking the Colorado Trail and eating organically grown, homemade, dehydrated kale soup or bison jerky. I love my life.
But I digress. Sort of.
The organic cherries used in this cobbler were locally grown and part of last week’s CSA delivery from Grant Family Farms. They were harvested some time ago, frozen as organic pie cherries and saved for fall baking. And oh my gosh – what a difference between the canned, processed, blah version of pie cherries and these little gems.
This recipe is my contribution to Shauna and Danny’s Gluten Free Thanksgiving Baking Challenge and online celebratory launch of their tasty new cookbook, Gluten-Free Girl and the Chef (which by the way, is wonderful).
Melissa’s gluten-free cherry cobbler
what you need for the filling
• 3 cups unsweetened pie cherries, about 1 & 1/2 pounds
• 2/3 cup organic cane sugar (or turbinado sugar)
• 2 tablespoons Pamela’s GF Baking & Pancake Mix
• 1 teaspoon cinnamon
• 1/4 teaspoon nutmeg
• dash of sea salt
what you need for the crumble topping
• 1/2 cup organic cane sugar (or turbinado sugar)
• 3/4 cup Pamela’s GF Baking & Pancake Mix
• 1/3 cup pastured butter (frozen works best)
• 1 cup chopped pecans
• 1/2 teaspoon cinnamon (optional)
what you do
• Preheat oven to 400 degrees
• Put prepared cherries in a large bowl
• In a medium bowl, mix up the dry ingredients you need for the cherry filling
• Pour over cherries, gently folding until well blended and cherries are covered
• Put cherry mixture in a glass pie dish
• Mix up the ingredients for the crumble topping *
• Place crumble topping mixture over cherries and press firmly in place
• Place pie on center rack of oven and bake for 40 to 45 minutes, checking after 20 or 30 minutes to make sure the top isn’t burning (I cover the pie loosely with tin foil after about 30 minutes to prevent burning)
• Tip – place tin foil on the bottom of the oven to prevent a mess if it boils over
* Freeze the butter and then grate it into the mixture using a cheese grater. It’s much easier than cutting it into the mix using knives.
* Shauna and Danny will be in Colorado on their book tour. Please check here for times and places and join in on the gluten-free fun.

Peace, joy and gluten-free love.
Melissa
Thursday, October 14th, 2010

This post was inspired by the people in my family (that would be Bill and Tevis) who have a funky allele from the shallow end of the “food sensitivity” gene pool. That little chromosome modification makes eating raw lettuce a digestive disaster.
Lettuce?
Yes, there are people who can’t eat raw lettuce. How weird is that? (This coming from someone who can’t eat gluten, bell peppers, black beans and eggplant. Or oysters, but that’s just because they’re icky.)
So, who says you have to eat lettuce raw?
Remember, you are the boss of your food. I find lettuce absolutely delicious sautéed and mixed in with other veggies and brown rice. Just like you would spinach or kale. What’s the difference? They’re all leafy and green.
sautéed lettuce and brown rice bowl (a favorite lunch of mine)
what you need
1 cup cooked brown rice (I love Golden Rose, but any brown or wild rice will do) *
1/4 cup chopped onion
1/4 cup chopped carrot
1/4 cup chopped celery
2 cloves minced garlic
1 to 2 cups washed and chopped lettuce (a thick and leafy type is best)
Spoonful of coconut oil (or oil of choice)
Several splashes of vegetable broth
Sprinkling of Parmesan cheese and roasted nuts (optional)
Dusting of gomasio * (or dried herbs, sea salt and freshly ground black pepper)
what you do
Heat oil on low/medium heat in a large skillet. Sauté onions, carrots and celery for 5 to 7 minutes, stir often. They should be lightly cooked, but still crunchy. Add garlic and cook another 2 to 3 minutes. Add rice and blend with veggies. If your rice is cold (cooked, but has been refrigerated), make sure you cook it long enough to heat it up. Add a splash of vegetable broth just enough to moisten the mix and prevent the rice and veggies from sticking to the pan. Add the lettuce and another splash of broth and stir well. Keep stirring and cook for another 3 to 5 minutes until lettuce is wilted. You might even put the lid on the skillet and let it steam for a minute or two. Place in bowl, top with cheese and seasonings.
I’m not guaranteeing this will solve your food sensitivity problem, but many people have difficulties consuming raw veggies, lettuce included and they never think to cook it first. We cook all other veggies, why not lettuce?

I get lots of Romaine lettuce from my Grant Family Farms CSA share and find this to be a perfect choice for cooking (see above photo of chopped Romaine). It’s thick, crunchy and hearty, so it stands up well when thrown in the sauté pan.
* For detailed information on rice types and cooking tips, please check here.
* For a wonderful gomasio recipe, check here.
Peace, love and cooked lettuce.
Melissa
Disclaimer: All material on this website is provided for informational and educational use only and
should not be used for diagnostic purposes. Consult with your physician regarding any health or medical concerns you may have.
|
|


