|
Archive for the ‘Gluten-Free Recipes’ Category
Wednesday, February 12th, 2014

How good does this one-pot roasted salmon, rice, and vegetable dish look? Amazing, wouldn’t you agree? This is my kind of meal — easy, healthy, and delicious.
No one knows gluten-free cooking and baking better than Carol Fenster. This post is about her newly revised and updated cookbook, Gluten-Free 101: The Essential Beginner’s Guide to Easy Gluten-Free Cooking. It’s also your opportunity to win your own copy.
But first, I must disclose that Carol is a good friend of mine. We have lunch together often and we’re never at a loss for words. In fact, three hour lunches are common for us. Aside from being the visionary in the world of gluten-free cooking, she’s an incredibly nice person — one of the nicest people you’d ever want to meet. For someone who’s known world-wide for her expertise, she’s over-the-top humble and remarkably generous with her knowledge. All she wants to do is help people navigate the gluten-free lifestyle in a healthy and delicious way. Carol’s been doing this long before it was trendy. In fact, she’s been creating gluten-free recipes, writing cookbooks (10 to date), sharing information, and increasing awareness of celiac disease and gluten sensitivity for over 25 years. She’s the ultimate expert.
Having said that, there’s a touch of newsworthy irony to Carol’s story. She grew up on a wheat farm in Nebraska and went on to marry a wheat farmer. Imagine how life-altering it was for her to be diagnosed with an intolerance to gluten? Her family’s livelihood was defined by wheat. It was the main topic of conversation during family gatherings. Her journey from wheat farmer’s daughter to the queen of gluten-free cooking hasn’t been easy. But Carol has a delightful sense of humor, a supportive family, and an unwavering spirit, so that part of the story is just a tasty footnote to her success.
Now, back to the features of Gluten-Free 101. This book is designed for people new to the gluten-free lifestyle, but there’s enough interesting information for even the most experienced cook. The book describes how to read labels, offers alternatives to gluten, gives substitutions, and details how to successfully stock a gluten-free pantry. The book also highlights 175 gluten-free recipes, including everything from basic quick bread to ham quiche to lemon bars. It’s all there, whether you’re new at this or a seasoned gluten-free expert. The gorgeous color photos (see salmon photo above) also make it a fun book to drool over.
Who wants to win their own copy? Trust me, it’s worth a try. Here’s all you have to do to be entered. Choose to do one of the following (or all) and then leave me a message here on my blog as to what you did or why you’d like to have this cookbook. I’ll choose a winner at random. The contest closes at midnight on Sunday, February 16th.
Make sure you leave me a message in the comment section so I know who is entered and how to get in touch with you if you win (your email address will remain private). Good luck!

Here’s a delicious sample recipe courtesy of Gluten-Free 101: The Essential Beginner’s Guide to Easy Gluten-Free Cooking, by Carol Fenster (Houghton Mifflin Harcourt, January 14, 2014, printed with permission)
One-Pot Roasted Salmon with Mediterranean Vegetables and Rice
Makes 4 servings
Preparation time: 10 minutes
Roasting time: 40 minutes
Ingredients
- 2 cups gluten-free low-sodium chicken broth, heated to boiling
- 1 cup long-grain white rice
- 5 ounces baby spinach
- 1 (6-1/2 ounce) jar marinated artichokes, drained
- 2 garlic cloves, minced
- 1 cup red grape tomatoes, halved
- 1/2 cup pitted black olives, sliced
- 4 small salmon fillets (about 4 ounces each)
- 2 tablespoons olive oil
- 2 tablespoons dry white wine or lemon juice
- 1/4 teaspoon salt, plus more to taste
- 1/4 teaspoon freshly ground black pepper, plus more to taste
- 1 teaspoon lemon-pepper seasoning or lemon-herb seasoning
Instructions
- Place a rack in the lower third of the oven. Preheat the oven to 400°F. Place the boiling broth and the rice in a deep, 2-quart baking dish.
- In a large bowl, toss the spinach, artichokes, and garlic together and place on top of the rice. Arrange the tomatoes and black olives around the edges of the dish. Arrange the salmon fillets on top of the spinach, drizzle with the olive oil and wine, and sprinkle with the salt, pepper, and lemon pepper seasoning. Cover tightly with a lid or aluminum foil.
- Roast in the oven for 30 minutes. Remove the lid and continue roasting until the fish flakes easily with a fork, 5 to 7 minutes, depending on the thickness of the fish. Serve immediately.
Per serving: 470 calories; 35g protein; 15g total fat; 4g fiber; 46g carbohydrates; 59mg cholesterol; 894mg sodium
Enjoy! Don’t forget to leave me a comment so you’re entered to win a copy of Gluten-Free 101.
Melissa
UPDATE: And the winner is — Nicole (#8 comment).
Wednesday, December 11th, 2013

Here it comes — the onrushing freight train of holiday cheer. Parties, shopping, family gatherings, cake, cookies, candies, eggnog, overeating. Stress!
One thing leads to another and as the holidays approach, we eat more sweets, drink more wine, sleep less, skip yoga class, and often end up sick.
There’s a reason we overeat at times like this. It just so happens we’re soothed by high-calorie, high-fat, sweet foods. It alters our brain chemistry. We actually find comfort in comfort food when we’re stressed out.
Stress causes anxiety. Anxiety causes the release of stress hormones, which trigger an elevation in heart rate and blood pressure. It’s a physiological feedback loop whether it’s caused by high-volume traffic, crowded shopping malls, money issues, or family squabbles. That defense system is designed to keep us alive if we’re running from danger, but it’s not healthy to rev it up on a continual basis. Studies show the brain kicks into flight-or-fight mode regardless of the stressor. Once we’re stressed, since there’s usually no snarling wild animal to outrun, we often settle in with a tin of holiday cookies or a piece of pie to soothe our fraying nerves. It actually works — for a few minutes. High calorie, sweet foods send a message to the brain that all is well. We’ve outsmarted the predator and we’re celebrating with a well-deserved treat. No need to run, no need to escape, no need to search for food. It’s all good. Have a piece of cake.
When we repeat this behavior over and over, our brain stays on alert, our blood pressure and heart rate remain elevated, our immune system weakens, and we’re much more susceptible to cold and flu cooties. Physical defenses are expensive. Our immune system needs the nutrient energy for real threats, not fighting off crowds at the mall.
Alas, our best intentions don’t always cut it this time of year. It’s hard to avoid an uptick in stress during the holidays, but we can at least set the stage for a boost in immune function by adding healing foods into the mix. Call it a health savings account. Try this immune booster soup in between shopping trips, cookie exchanges, and office parties. The best defense is a good offense — nutritionally speaking.
Immune-Booster Soup (Gluten-Free)
What you need
- 1 small to medium potato, peeled and chopped *
- ½ cup shiitake mushrooms, cleaned and chopped
- 8 cups chicken broth, divided (if not homemade, I use Imagine Gluten-Free Organic Chicken Broth)
- 2 tablespoons cooking oil
- 1 small onion, about ½ cup chopped
- 6 cloves garlic, minced
- 4 stalks celery with leaves, chopped
- 4 carrots, chopped
- 1 medium sweet potato, peeled and chopped
- 8-ounce can organic tomato sauce (not tomato paste)
- 1 cup cooked and diced chicken
- 8-ounce can organic beans, rinsed (or dried and cooked beans) *
- 2 cups spinach
- herbs, sea salt, black pepper *
What you do
- Place chopped potato in a medium saucepan. Cover with about 2 or 3 cups chicken broth and bring to a light boil. Use enough chicken broth to simmer potatoes until fully cooked. After about 10 minutes of simmering, add the chopped shiitake mushrooms to the potato/chicken broth mix. Continue simmering for another 5 to 10 minutes, until potatoes are fully cooked and mushrooms are cooked, but not mushy. Remove from heat and set aside to cool.
- In a large soup pot, heat oil over low-medium heat. Add onions and garlic and cook for 5 to 7 minutes, stirring often. Add 2 cups chicken broth, celery, carrots, sweet potato, tomato sauce, and cooked chicken. Turn heat to low.
- Place cooled chicken broth-potato-mushroom mixture into a VitaMix or other blender. Make sure the mixture has cooled enough to blend. Add 1 to 2 cups of room temperature chicken broth and blend until all ingredients are incorporated. Mixture should be a gravy-like consistency, but not too thick. Add more broth during blending as needed. Pour the mixture into the soup pot, along with any remaining chicken broth, and stir gently. At this point, all the chicken broth (approximately 8 cups), the cooked chicken, and the vegetables, with the exception of the beans and spinach, are in the pot simmering on low.
- Cook on low for 2 hours or more. This can simmer on low all afternoon. Add rinsed beans (I like pinto or cannellini beans, but any kind is fine), herbs, seasonings, and spinach about 15 to 30 minutes before serving.
- Enjoy and stay healthy!
Cook’s notes (worth reading):
- I normally use a small-medium, organic RED potato for this base, because it has less starch than a Russet or Yukon Gold. I use potatoes as a thickener in lots of my recipes, rather than using a processed gluten-free flour or starch, but I choose my potato variety according to how much thickening I want in the recipe.
- I often use dried, cooked beans, but when I’m pressed for time, I use a can of beans from Eden Organics. Canned beans retain their fiber and Eden Organics uses BPA-free cans. Canned beans are a healthy option in soups and stews.
- Simply Organic All-Purpose Seasoning is my favorite “go-to” seasoning. I use about 2 tablespoons in this recipe.
- Rather than adding the spinach to the soup, place ½ cup of raw spinach (or kale, chard, beet greens) in a bowl or soup mug. Ladle the hot soup directly over the spinach and gently stir. This warms the spinach, but also keeps it fresh and slightly wilted.
This article and recipe can also be found on this month’s NANP (National Association of Nutrition Professionals) E-Zine. If you’re interested in nutrition tips, healthy recipes, and upcoming conferences, check out the NANP website here and sign up for our newsletter here. Don’t worry, we hate SPAM, so your email address is safe with us. You can also Like our Facebook Page for more spectacular nutrition news.
Peace, love, and immune booster veggies!
Melissa
Thursday, October 24th, 2013
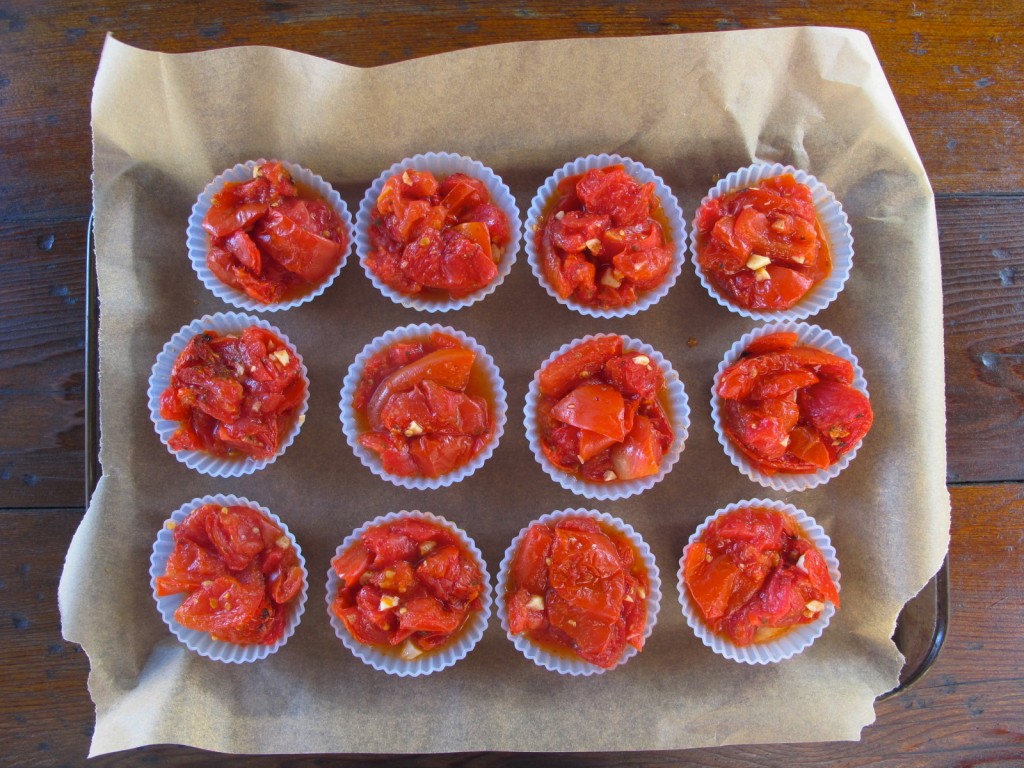
I’m lucky enough to live next door to the most prolific organic tomato gardener in all of Colorado. My geographic good fortune and love of simple food has sparked my produce-sparing creativity. Every few days I get another supply of tomatoes. Tossing even one of these gems into the compost pile is not an option. They are that good.
Here’s my way of saving the harvest and enjoying them all winter long. This is a “launching pad” recipe. Adjust according to what you have and how much you want to freeze. Once frozen, you can toss however many you need into soups and stews or thaw and blitz for pizza sauce.
Frozen roasted tomatoes (I used 10 medium-size tomatoes for the photo above)
What you need
Fresh tomatoes, washed and quartered (deseed and drain off most of the liquid)
Garlic, minced (I used 6 cloves for this bunch; garlic is optional)
Extra virgin olive oil
Silicone (not paper) muffin cups (these are the kind I use)
What you do
Place parchment paper on a large baking sheet. Preheat oven to 425 degrees. Put prepared tomatoes and garlic in a large bowl. Drizzle a small amount of olive oil over ingredients and toss gently. Arrange tomatoes in a layer on the baking sheet. Place in the oven and set the timer for about 6 to 8 minutes. Using tongs or a spatula, periodically rearrange the tomatoes so they roast evenly. It takes a total of about 30 minutes to fully roast them, but do it in increments and check often as they burn easily. Remove from oven and let cool. Once the tomatoes have cooled, using tongs, fill the silicone muffin cups with tomatoes. Place the filled muffin cups on a cookie sheet and put in the freezer. Once frozen, pop the frozen tomatoes out of the silicone muffin cups and place into a freezer container or plastic freezer bag. Use as needed.
The photo above was taken after the tomatoes were roasted and placed in the muffin cups, but before I put the cookie sheet into my freezer. Use silicone muffin cups. Paper muffin cups don’t work.
Next up, gluten-free roasted tomato and basil pizza. Stay tuned. You will not believe how good this is.
Peace, love and frozen tomatoes.
Melissa
Monday, October 14th, 2013

Before I get to my favorite gluten-free products, let me start by saying, I’m not fond of food “products.” I’m a nutritionist specializing in healthy, active, gluten-free living. That means a focus on whole foods and an active lifestyle, not gluten-free Dunkin’ Donuts, processed food, and unlimited couch time. I advise people to stick with the real thing (vegetables, fruit, nuts, seeds, a few naturally gluten-free grains, small amounts of high-quality meat). That’s straight forward and simple enough.
Hey wait—back up. No, it’s not simple. It’s hard and frustrating at times!
What if you want an oatmeal cookie, a pumpkin muffin, some pancakes, a grilled cheese sandwich, or a pizza?
These are the most common questions/comments I get from people who are newly diagnosed with gluten-related issues. Help! Tell me what I can eat. Tell me what bread to buy. How can I possibly survive without wheat? All the gluten-free products taste like ground styrofoam.
I know. I get it. I like pancakes, cookies, and grilled cheese sandwiches, too. And there’s nothing better than a pizza piled high with fresh vegetables.
Here’s the deal, though—those should be occasional treats, not daily indulgences. We thrive on real food, not meals from boxes with futuristic expiration dates. But don’t despair, there are ways to navigate the super market and make wise choices when it comes to gluten-free packaged food.
We have to live in the real world, right? Every once in awhile we’re going to want something we didn’t grow from scratch, hunt down, or buy at the farmer’s market. Here are my top 5 favorite gluten-free products.
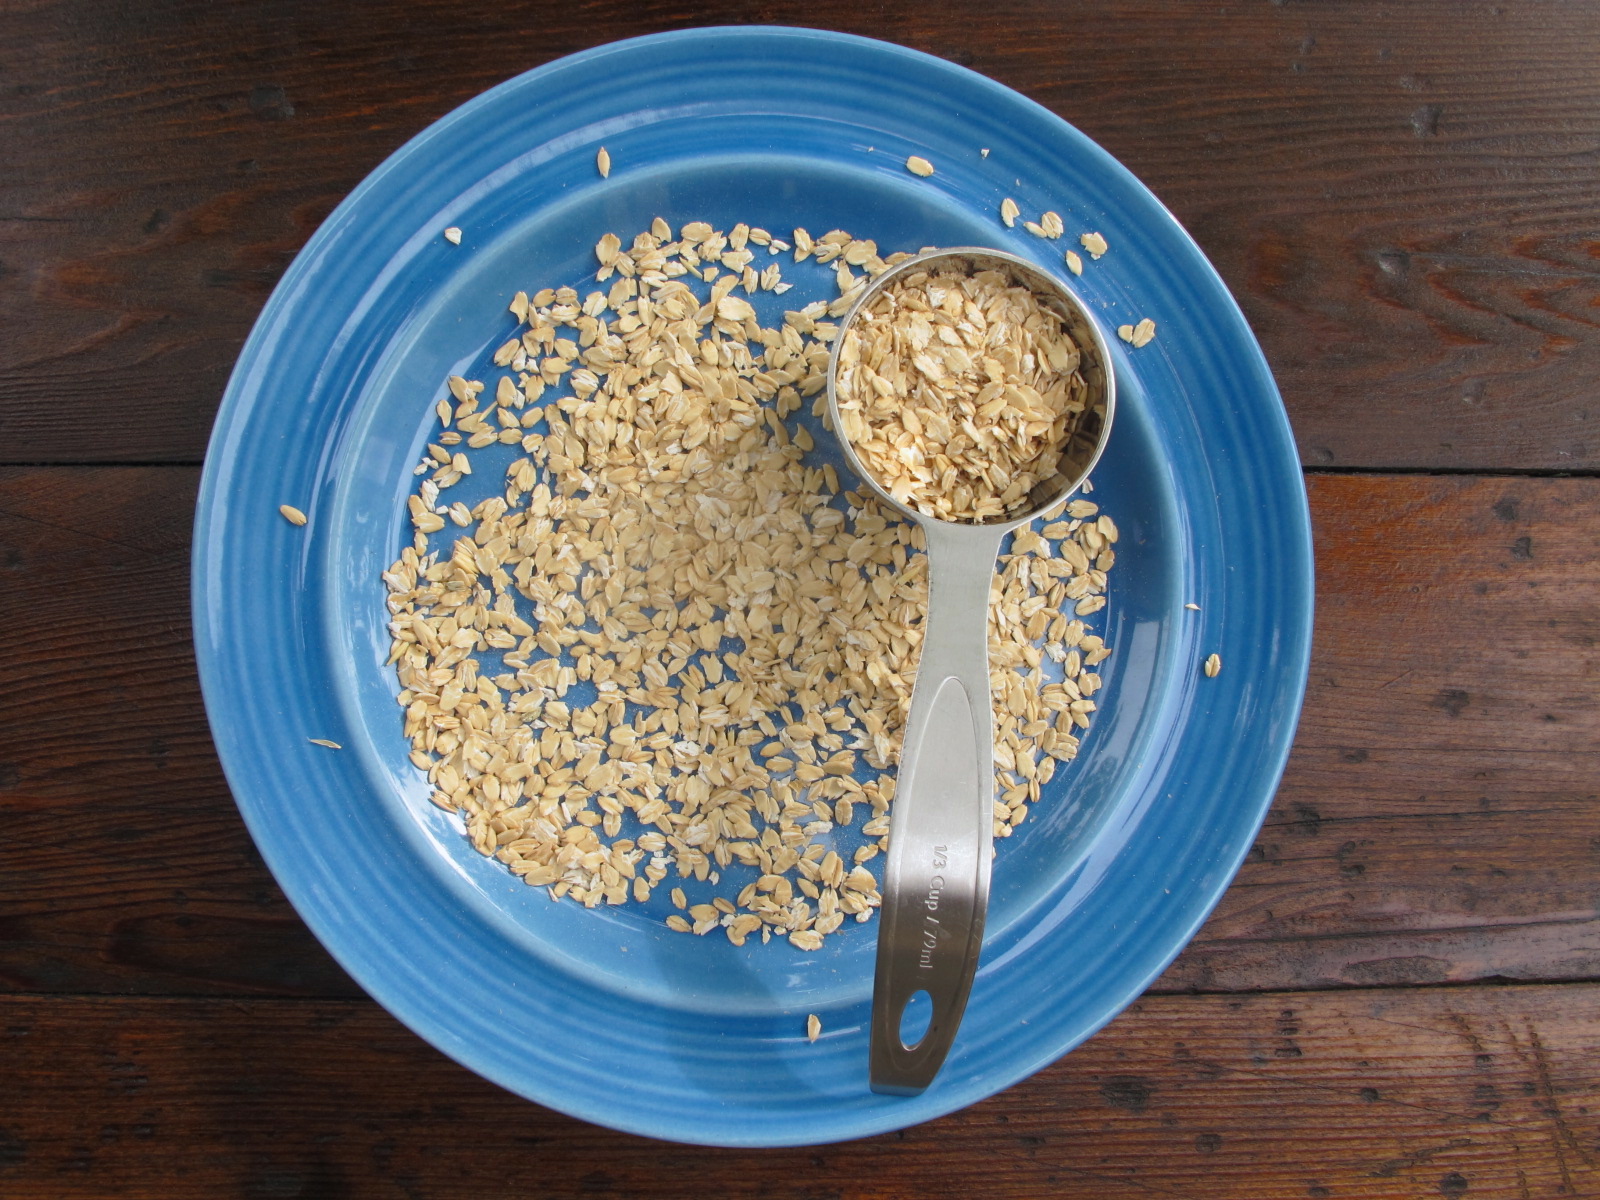
Montana PrOatina Gluten-Free Oats
Ingredients: Whole-Grain Rolled Oats (see photo above)
These are 100% whole grain oats and although they’re processed to some degree, the processing is minimal and done with great care (dry milled, no heat applied). These aren’t your typical oats. They’ve been carefully selected (by nerdy plant scientists) for their high protein content and favorable amino acid profile. They’re also very low in avenin, the peptide thought to be responsible for allergic reactions. Yes, I know—as part of a gluten-free diet, oats are somewhat controversial, but recent research indicates that pure, uncontaminated oats are safe for most people with celiac disease and gluten-related issues. This study found no immune response to avenin in people with celiac disease, but check with your health care provider if you have concerns. It’s often the high fiber content that bothers people and not the protein. Aside from hearty oatmeal, these oats make the best cookies. If you don’t want to do the baking yourself, check out Gluten-Free Prairie. They use these oats for their “Granola Bites” and “Hunger Buster Oatmeal Cookies.” They’re delicious.
Tinkyada Organic Brown Rice Pasta
Ingredients: Organic Brown Rice, Water
I love pesto, but it needs to be tossed into a bowl of pasta for optimal enjoyment. I make pesto out of a variety of different greens, from spinach to mustard micro-greens to baby kale (check out this recipe on my other website, Artful-Aging.com). Tinkyada pasta is the best gluten-free version I’ve found. It’s organic, easy to work with, and never mushy. They also have a great selection of pasta types (spaghetti, elbow, penne, etc.).
Pamela’s Baking & Pancake Mix
Ingredients: Brown Rice Flour, White Rice Flour, Cultured Buttermilk, Natural Almond Meal (may appear as brown flecks), Tapioca Starch, Sweet Rice Flour, Potato Starch, Grainless & Aluminum Free Baking Powder, Baking Soda, Sea Salt, Xanthan Gum
I no longer blend my own gluten-free baking mixes because Pamela’s general baking mix is as good as it gets. This gluten-free mix rivals the best out there, whether gluten-free or not. I’ve use it for pancakes, waffles, muffins, quick-breads, and cookies and haven’t had any trouble substituting it for wheat flour. If you have a nut allergy, this mix is not for you as it contains almond meal.
Canyon Bakehouse 7 Grain Bread
Ingredients: Water, Brown Rice Flour, Tapioca Flour, Whole Grain Sorghum Flour, Eggs, Organic Agave Syrup, Whole Grain Teff, Whole Grain Millet, Xanthan Gum, Extra Virgin Olive Oil, Sugarcane Molasses, Whole Grain Quinoa, Whole Grain Amaranth, Whole Buckwheat Flour, Yeast, Cultured Brown Rice Flour, Sea Salt, Natural Enzymes
Canyon Bakehouse is a dedicated gluten-free bakery located in Loveland, Colorado. This 7-grain bread is my favorite, all-purpose, ready-made bread. It’s packed with healthy, whole grains like teff, quinoa, and amaranth and has a wheat-like texture. It’s even good without toasting it (the litmus test for good gluten-free bread).
Outside the Breadbox Pizza Crusts
Ingredients: Filtered Water, Tapioca Starch, Brown Rice Flour, Rice Starch, Olive Oil, Organic Tapioca Syrup, Egg White, Turbinado Sugar, Yeast, Xanthan Gum, Sea Salt, Cider Vinegar, Enzymes
Outside The Breadbox is a dedicated gluten-free bakery located in the historic district of Colorado Springs. These 12-inch pizza crusts are easy to prepare and make a delicious, thin crust. They’re hard to come by, especially if you don’t live in Colorado, but you can order them directly from the bakery.
Do you have any favorites that should be on this list?
Peace, love, and occasional treats!
Melissa
Thursday, April 11th, 2013

I wonder how many beets I’ve eaten in my lifetime?
As a toddler, my mom gave me roasted and smashed up beets for “dessert.” With no hesitation, she actually called beets “dessert.” So did I until I was set straight by Penny Bell at my first sleep-over. You can imagine my surprise when I found out other kids got Twinkies and Ding Dongs for dessert while I was eating some version of root vegetable paté.
Such is life. We learn early on, that in one way or another, all families are weird, quirky, different, and wonderful. My mom was a mixture of Elizabeth Taylor (glamorous), Julia Child (a gourmet cook), Amelia Earhart (adventurous), and Lucille Ball (off-the-wall funny). “Beets for dessert” was just part of her unconventional culinary repertoire.
In all this time, it’s never dawned on me to pickle beets. In fact, I’ve never pickled anything. It was easy. I made a batch of pickled beets and ate them for four days straight. I have a new addition to my beet arsenal.
Arugula and pickled beet salad
What you need
For the beets
1 bunch fresh beets (I used 3 large beets), scrubbed with tops cut off (leave 2 inches)
3/4 cup apple cider vinegar
3/4 cup water
2 tablespoons raw cane sugar (I used organic Turbinado sugar)
For the salad
fresh, organic baby arugula (any salad greens)
chopped pecans
shaved Parmesan or crumbled goat cheese
For the Dressing
1 tablespoon dijon mustard (I use Annie’s Organic Dijon Mustard, it’s gluten-free)
1 tablespoon apple cider vinegar
1 tablespoon honey or organic agave nectar
2-3 tablespoons olive oil
freshly ground black pepper
What you do
1. Place scrubbed and trimmed whole beets in a large saucepan or soup pot. Add enough cold water to cover with about 3 inches extra. Bring to a light boil, turn heat down and simmer for about 40 minutes, or until tender when pierced with a fork. Drain and let beets cool. When cool enough to handle, slip the skins off and slice in thick rounds.
2. Place apple cider vinegar, water, and sugar in a saucepan. Bring to a low boil, reduce heat, and slowly simmer for about 10 minutes. Stir often to dissolve sugar.
3. Place sliced beets in a shallow glass dish. Pour liquid over the beets, making sure all are covered. Refrigerate for at least an hour. Drain and store pickled beets in a glass container in the refrigerator for up to a week.
4. To make dressing, first place mustard in a glass jar. If you start with the mustard, it won’t separate. Add apple cider vinegar, honey, olive oil, and freshly ground black pepper (to taste). Replace the lid and shake like crazy.
5. Place arugula on salad plates, arrange beets on the greens, sprinkle chopped pecans and grated Parmesan over the salad. Drizzle with dressing and serve.
And the beet goes on—you might also like
From my blog
Deadly serious beet and spinach salad very similar to this salad
Beet greens and brown rice with tips on preparing and storing beets
Performance enhancing beets why beets should be on every athlete’s table
Chocolate beet cupcakes
Beet ice cream
Beet nutrition
From Alta at Tasty Eats at Home (she’s also a beet fanatic)
Orange and beet salad with basil vinaigrette
Raw summer beet salad a favorite of mine
Roasted squash, caramelized beets, and beet greens
Roasted beet humus
Peace, joy and beet love!
Melissa
Friday, February 8th, 2013

File this one under, get well soon.
I never get sick. I can’t even remember the last time I had a cold. In fact, I can hang out with the sickest of the sick and it doesn’t faze me. My immune system scoffs at cooties.
At least until last weekend’s all-day, convoluted flight aboard a Delta 757 hack-a-thon.
There was no where to run. No where to hide. I couldn’t escape the recirculating, germ-infested, potently disgusting, cough cloud.
Drats, I’m down for the count.
Now what?
Here’s my answer — shiitake mushroom, vegetable, and chicken soup.
Take that, you cold cooties.
I’ve been making different versions of this soup for years. I don’t have a recipe. I made it up and it varies depending on what I have on hand. One thing that doesn’t change is the base, which I make out of chicken broth, mushrooms (usually shiitake, but others will do), and a potato. That’s my medicinal launching pad.
Here’s how it goes, but remember, this is an outline, not an exact formula. Be creative.
Melissa’s medicinal soup
What you need
1 small to medium-sized potato, peeled and chopped *
handful of shiitake mushrooms (about 1/2 cup), cleaned and chopped
8 cups chicken broth, divided (if not homemade, I use Imagine GF Organic Chicken Broth)
2 tablespoons oil (I use coconut oil, but any will do)
1/2 cup chopped onions
6 cloves garlic, minced
4 stalks celery with leaves, chopped
4 carrots, chopped
1 sweet potato or yam, peeled and chopped
8-ounce can organic tomato sauce (not tomato paste, I use this version)
1 cup cooked, diced chicken
beans (one 15-ounce can, or dried cooked beans) *
2 cups spinach
herbs, sea salt, black pepper
What you do
1. Place chopped potato in a medium sauce pan. Cover with about 2 or 3 cups chicken broth and bring to a light boil. Use enough chicken broth to simmer potatoes until fully cooked. After about 10 minutes, add the chopped shiitake mushrooms to the potato/chicken broth mix. Cook for another 5 to 7 minutes, until potatoes are fully cooked and mushrooms are cooked, but not mushy. Turn heat off, set aside to cool.
2. In a large soup pot, heat oil over low-medium heat. Add onions and garlic and cook for 5 minutes, stirring often. Add 2 cups chicken broth, celery, carrots, sweet potato, tomato sauce, and cooked chicken. Turn heat to low.
3. Place cooled chicken broth-potato-mushroom mixture into a VitaMix or other blender. Make sure the mixture has cooled somewhat. Add another cup or two of room-temperature chicken broth and blend until all ingredients are incorporated. Mixture should be a gravy-like consistency, but not too thick. Add more broth during blending as needed. Pour the blend into soup pot, along with any remaining chicken broth. At this point, all the chicken broth (approximately 8 cups), the cooked chicken, and the vegetables, with the exception of the beans and the spinach, are in the pot simmering on low.
4. Cook on low for 2 hours or more. This can simmer on low all afternoon. Add rinsed beans (any kind is fine), herbs, seasonings, and spinach about a half hour before you’re ready to serve the soup. Canned beans get mushy if you cook them too long, add them add the end.
5. Serve and get well soon.
Cook’s notes (important):
* I normally use a small-medium Red potato for this base, because it has less starch than a Russet or Yukon Gold. I use potatoes as a thickener in lots of my recipes, rather than using a processed gluten-free flour or starch, but I choose my potato variety according to how much thickening I want in the recipe.
* I often use cooked, dried beans, but when I’m pressed for time, I use a can of beans (any kind) from Eden Organics. Canned beans retain their fiber and Eden Organics uses BPA-free cans. Canned beans are a healthy choice in a meal like this.
* Simply Organic All Purpose Seasoning is my favorite “go-to” seasoning. I use about 2 tablespoons in this recipe.
* Rather than adding the spinach to the soup, a half a cup of raw baby spinach can be placed in the bottom of a soup bowl or mug. Ladle the hot soup directly over the spinach and gently stir. That way the spinach is warm, but also fresh and just lightly wilted. That’s my favorite way to add spinach to soups.
Peace, love, and cootie-busting soup.
Melissa
Wednesday, December 12th, 2012

My last post was about iron-deficiency anemia, celiac disease, and iron-rich foods. It came with a heavy dose of red blood cell biology and those of you willing to wade through it, not unsubscribe, and leave a comment at the end were rewarded with an opportunity to win a copy of The Gluten-Free Edge, my sports nutrition book co-written with Peter Bronski.
And the winner is (drum roll, please)—Jennifer R! Thank you all for participating and congratulations to Jennifer.
Since it’s the season for giving, I’m going to keep the giveaway streak going (see details below).
I thought I’d follow up my anemia post with a gluten-free, iron-packed, power-bar recipe that I developed as a homemade alternative to store-bought energy bars. This one is a take-off on an almond meal version featured in the recipe section of The Gluten-Free Edge and is proof that vegetarians (even vegans) can get the iron and protein they need if they do it right.
Gluten-free oat bran power bar (makes 16 servings)
What you need
1/2 cup oat bran (I used Montana Gluten-Free Oat Bran, see details below)
1 teaspoon ground cinnamon
1/4 teaspoon sea salt
1 cup walnuts
1 cup almonds
1 cup dried, unsulphured apricots, chopped
1/3 cup certified gluten-free oats (I get mine from MT GF Processors or GF Prairie)
1/2 cup chocolate chips (make sure they’re gluten-free)
1/3 cup honey
1 large egg
2 tablespoons coconut oil, melted, plus some to grease the pan
1-1/2 teaspoon vanilla
What you do
1. Preheat oven to 350 degrees. Grease a 9-inch square baking pan (I used a dark-colored metal baking pan).
2. Place the oat bran, the cinnamon, and the sea salt in a food processor and pulse until well mixed.
3. Add the walnuts, almonds, apricots, and oats and pulse several times, until the nuts and apricots are in small chunks but not completely ground. Add the chocolate chips and pulse a few times, leaving larger chunks.
4. In a bowl big enough to hold all the ingredients, whisk together the honey, egg, melted coconut oil, and vanilla. Whisk for 1 minute to ensure the ingredients are well mixed.
5. Add the dry (pulsed) ingredients to the wet ingredients and mash together with a fork. Use your hands if you have to and make sure everything is mixed together.
6. Spread the mixture in the prepared pan. Cover with parchment paper and, using your hands, press and flatten evenly. You can also use a flat spatula to even out the mixture. Remove the parchment paper.
7. Place pan on center rack of the oven and bake for 22 to 24 minutes, until golden brown. Remove from oven and let cool. Place the pan in the refrigerator to chill before cutting into bars. Store bars in an airtight container in the fridge, or wrap individually and freeze.
These bars are power-packed with nutrition and great for athletes. They’re high in carbohydrates (great workout fuel), high in protein (for recovery), and super high in iron (building blocks for RBCs, see prior post). The iron is mainly from the oat bran. The bars are also high in fat (another source of workout fuel), but the fat is from healthy sources, so don’t fret. Because of the high fat content, they aren’t low calorie, but if you need a boost while out hiking, biking, or during a mid-afternoon work slump, these power bars will serve you well.
PER SERVING (1 bar): 225 calories; 14 g fat; 22 g carbohydrate; 6 g protein; 3 g fiber
NUTRITION BONUS: 1 bar provides 30% of the RDA of iron
Would you like a 3-pound bag of this nourishing Montana Gluten-Free Oat Bran? It’s grown out west by awesome big sky farmers and is minimally “processed” in a dedicated, state-of-the-art, gluten-free facility. The oat bran is dry milled, with no heat applied during preparation or packaging. It’s good stuff, non-GMO, is tested and certified gluten-free, and is a great way to boost the nutritional value of GF baked goods. Most GF baked goods are low in iron and other nutrients. Tossing in some oat bran solves that problem.
To enter the giveaway, leave a comment on how you’d use the oat bran. Be creative—I’m curious. Make sure you include your email address where prompted. I’ll pick the winner via random.org. Good luck and happy baking!
Peace, love, and oat bran!
Melissa
PS I’m not employed in any way by MT GF Processors or GF Prairie. No one asked me to blog about the products or do giveaways. I’m not paid to do it. I buy my own products and endorse the farmers and product developers whom I believe are doing it right. There’s been an explosion in the GF market and a lot of the stuff has the nutritional value of ground styrofoam. It’s junk food. I want the good guys to be successful. We need to support this “grass roots” movement. Our health and the health of the environment depend on it.
Go hug a farmer!
Wednesday, November 28th, 2012

I had a post on anemia in the works, complete with details on the structure, function, and production of red blood cells, but I got sidetracked by coffee cake. Iron-poor blood will have to wait. This cake is that good. Plus, it fits in with a study I read this morning.
It’s the holidays and this time of year often triggers an uptick in anxiety-related behavior. Cake is comfort food. Did you go to Target or Best Buy on Black Friday? Did your Thanksgiving dinner look more like a Woody Allen movie than a Norman Rockwell painting? Are you stressed about work, money, politics, the weather?
Here, have a piece of cake.
And guess what? A bunch of researchers (17 scientists) put together a collective study and concluded that, “…the hedonic and rewarding properties of palatable foods have stress-buffering actions across numerous effector pathways (neuroendocrine, behavioral, and the sympathetic nervous system).”
Hedonic?
Apparently our HPA (Hypothalamic-Pituitary-Adrenocortical) axis and the sympathetic branch of our autonomic nervous system lights up (neuro-nirvana) with the intake of “hedonic” food (i.e. cake). We’re being rewarded for eating fat and sugar. The study states that, “Indeed, comfort food intake in humans is linked with improved emotional states….”
Really? It took 17 scientists to confirm that we want cake, cookies, and ice cream when we’re stressed?
Since I’m in the Christmas spirit and this coffee cake is so divine, I won’t belabor the unintended consequences of overeating hedonic (sorry, that word is just too much fun) food for stress relief.
Yes, we know that binging on sweets is not a good idea. But who reaches for bok choy or burdock root when they’re stressed? And, yes, we know that eating high fat, high carb food can lead to diabetes, heart disease, cancer, and blah-blah-blah.
Let’s put all that aside for now, take this one bite at a time, and enjoy the holidays responsibly. I’m for baking an occasional treat, sharing it with friends and family, and not over-indulging. I created this coffee cake recipe for a holiday brunch I’m having on Christmas day. When I perfected the recipe on my third try, I gave half of it to my neighbors (reluctantly). When I make it next time, I’ll have lots of people to share it with. I’m taking protective measures, but I still plan to enjoy a little hedonic buzz now and then.
Gluten-free pumpkin pie coffee cake
What you need
Coffee Cake
2 – 1/2 cups Pamela’s Baking and Pancake Mix
1 cup pumpkin pie mix (I used Farmer’s Market Organic Pumpkin Pie Mix)
1/2 cup light coconut milk (I used Native Forest Organic Light Coconut Milk)
2 large eggs (these were my CSA pastured eggs from Grant Farms)
1/4 cup organic turbinado sugar *
1/4 cup organic butter, melted
1 – 1/2 teaspoon pumpkin pie spice (I used Savory Spice Shop’s salt-free pumpkin pie spice)
1 teaspoon vanilla (I used Madagascar vanilla)
Streusel Topping
1/2 cup Pamela’s Baking and Pancake Mix
1/2 cup turbinado sugar
1/2 cup chopped pecans
1/4 cup butter, chilled
What you do
1. Preheat oven to 350°. Butter a 9 x 9 inch square baking pan (I used a dark 9 x 9 inch square baking pan).
2. Place Pamela’s mix and the pumpkin pie spice in a medium bowl. Whisk to blend the two dry ingredients.
3. Beat butter and sugar together on medium speed, about 30 seconds, until creamy. Add eggs, vanilla, coconut milk, and pumpkin pie mix and continue mixing on low, about 30 seconds to 1 minute.
4. Add dry ingredients to wet and mix on low until well blended.
5. Spoon into baking pan and spread evenly. You may need to use a wet knife to spread the batter.
6. To prepare the streusel topping: Place Pamela’s mix, turbinado sugar, and chopped pecans in a medium bowl. Stir to mix. Cut in chilled butter (I use a cheese grater) and mix well. Sprinkle over batter.
7. Place coffee cake on center rack of oven and bake for 45 minutes. Check after 20 to 30 minutes and cover loosely with foil if the streusel starts over-browning (it will, so watch it). You want it nicely browned, not burned.
8. Cool slightly and serve. You can make this a day ahead if you’d like. It’s almost better the next day.
* Organic Turbinado sugar, also called raw cane sugar, is made by the first crushing of freshly-cut sugar cane. It’s still sugar, but less refined and grown organically. The crystals are larger and crunchier and have a molasses flavor to them. Molasses is a byproduct of the process and retained in Turbinado sugar. It’s perfect for streusel topping.
Peace, love, and hedonic food (in small doses on special occasions).
Melissa
Wednesday, November 14th, 2012
You know how bloggers have those long titles that indicate everything that’s missing from a recipe?
“Gluten-free, grain-free, sugar-free, dairy-free, soy-free, corn-free, nut-free, nightshade-free, pesticide-free, GMO-free gingersnaps.”
I’m not criticizing, as I’ve been guilty of my own version of this, I’m just pointing out how “free-from” obsessed we’ve become.
Or, maybe I’m just preparing you for — cue scary music — sugar-full, egg-full, dairy-megeddon cheesecake.
But first, this is my mom, back in her “salad days.” She had unusual and clever terms for everything from being young and beautiful (salad days) to dying (stepping off). She was funny, brilliant, beautiful, and feisty—right up to the moment she stepped off, which she did in typical fashion (full of grace and humor) last month. Margaret was 96-plus years old when she died. Hers was definitely a life well-lived.

I grew up eating whole foods. My mom was an amazing cook. She never relied on processed food, TV dinners, or store-bought cookies. Ever. She made everything from scratch and didn’t shy away from butter, bacon fat, eggs, cream, or sugar. We also ate fresh beets, broccoli, cabbage, spinach, beans, quinoa (where she found quinoa all those years ago, I have no idea), wild and brown rice, and a host of other fresh vegetables and whole grains. We didn’t eat much meat because she was frugal, but the meat she did buy was the good stuff and she made it last by using a small amount to make a big meal. Ham and lima bean soup that lasted for days. Beef stew with a ton of vegetables. Brown rice, vegetable, and chicken soup. She made bread and biscuits from scratch and delighted in serving over-the-top desserts when we had guests. Margaret was famous for her creme brulée, cheesecake, chocolate peanut butter cake, brownies, and lemon meringue pie, but she refused to share recipes. Absolutely refused.
When my mom stepped off, the first thing I put “dibs” on was her recipe box, which I found tucked away in the back corner of a rarely-used cabinet. Along with her recipes were several vintage cookbooks and old kitchen utensils. I sat on her kitchen floor for at least an hour, thumbing through recipes, flipping through cookbooks, playing with utensils. Tears running down my face.
I have a sign in my kitchen: Love people. Cook them good food.
I’m blessed to have been taught that. Thank you, mom.
And now (drum roll, please) I’m sharing Margaret’s cheesecake recipe, of which, we served at her “stepping off party.” Please bake it with joy and share it with love. This cheesecake is a Thanksgiving tradition at our house, but this year I’ll be making it instead of my mom. Sniff, sniff. But life goes on, so let’s be thankful for family, friends, and cheesecake.

Margaret’s Cheesecake (gluten-free, but full of dairy, fat, and sugar)
What you need
2 packages (8 ounces each) cream cheese, softened
2/3 cup, plus 3 tablespoons sugar
3 extra large eggs
1 & 1/2 teaspoon vanilla
1 carton (8 ounces) sour cream
What you do
Beat together until smooth — cream cheese, 2/3 cup of the sugar, eggs, and 1/2 teaspoon of the vanilla. pour the mixture into a buttered 9 & 1/2 inch glass pie plate. (This Pyrex pie plate works the best. It’s a touch bigger than traditional pie plates.) Bake in preheated, 350° oven for 25 to 35 minutes, or until puffy and lightly brown around the edges. When done, it should spring back when lightly touched in the center. Cool cheesecake at room temperature (will sink slightly). Whisk together sour cream, remaining 3 tablespoons of sugar, and remaining 1 teaspoon of vanilla. Spread over cheesecake 1/2 inch from edges. Continue to bake at 350° for an additional 15 to 20 minutes. Cool and refrigerate. Top with fresh fruit or fruit compote if desired (optional, it’s just as good plain).

Several people from the assisted living home where my mom lived came to her “celebration” service. An elderly man came up to me after the service, took both my hands in his, looked me straight in the eye and said, “Your mother really liked me. She brought me the best homemade cookies and brownies.”
I love the fact that this elderly, hunched over, little gentleman said, “Your mother really liked me.” What a gift to give someone. Good food and a warm heart.
Happy Thanksgiving everyone. I’m grateful for all of you.
Now, go, cook good food for those you love and be thankful for the fact that you can.
Peace, love, and cheesecake.
Melissa
PS If you’re worried about the fat and sugar content in this cheesecake, keep in mind that my mom lived to be 96-plus years old and she often ate cheesecake for breakfast. Nourishment is about more than just food.
Wednesday, July 25th, 2012

Gluten-Free Tomato and Arugula Pizza
I have a half-written blog post on weight loss, carbohydrate and fat metabolism, and mitochondrial dysfunction, but it’s taking me some time to sort through the material and make it marginally readable. I want to share my findings with you, but it’s a tough subject to make entertaining. I’ve discovered some interesting variables in my attempt to get back in shape and lose the weight I gained while co-writing (with endurance athlete Pete Bronski, founder of No Gluten No Problem) a book on gluten-free sports nutrition and training.
Yes, I do see the irony.
Anyway, I know you’re dying to hear all about metabolic flexibility and why boosting the density of your mitochondria will help you burn calories more efficiently, but you’ll have to wait until next week. This whole weight loss thing is not easy, at least not if you plan to keep it off FOREVER. That’s the point, right?
But for now, although not exactly “diet” food, let’s talk about gluten-free pizza. Yes, I know — I have an excessive number of pizza-centered posts here on my blog. Pizza is my comfort food and I’m not afraid of carbs (decent carbs), so I usually make some version of vegetarian pizza at least once a week. This was the “Friday night special” last week. I served it with a nice, semi-chilled glass of red wine. There’s no reason a couple of slices of this pizza can’t be part of a healthy eating plan, especially if you top it with low calorie, nutrient-rich vegetables.
As some of you know, I have a CSA share through Grant Family Farms. It includes organic veggies, fruit, pastured eggs, and micro-greens. I’m loving the micro-greens and have been experimenting with everything from mustard micro-green pesto to komatsuna salads. This recipe is for fresh arugula topped pizza.
Gluten-free tomato and arugula micro-green pizza
what you need
1 package (2 crusts) Udi’s gluten-free pizza crusts (or, your favorite version)
1 to 2 tablespoons extra virgin olive oil
2 cloves garlic, finely minced (more if you like garlic)
tomatoes, thinly sliced, juice and seeds removed *
sprinkling of cheese
fresh arugula micro greens, about 2 cups washed and dried
what you do
1. Brush the pizza crust with a small amount of olive oil. Don’t use too much, but cover the crust with a thin brushing of oil.
2. Sprinkle with minced garlic and top with sliced tomatoes. I like to use a lot of tomatoes and cover the whole pizza with a single layer.
3. Top with shredded cheese. I used a small amount of freshly grated Parmesan cheese on this pizza, but any cheese is fine.
4. Bake according to pizza crust directions. I’ve been baking the pizza on the outside grill because it’s been too hot to turn the oven on. The crust comes out nice and crunchy.
5. Once the pizza is cooked, top with fresh arugula.
* I slice the tomatoes and spin them in my salad spinner to de-juice them. Then I save the juice to add to homemade salad dressings.
Peace, love, and gluten-free pizza!
Melissa
P.S. Stay tuned for mitochondrial density, movement, and weight loss.
Disclaimer: All material on this website is provided for informational and educational use only and
should not be used for diagnostic purposes. Consult with your physician regarding any health or medical concerns you may have.
|
|